
Exercises after shoulder dislocation surgery start in the first days with the hand and elbow, then the shoulder movement your surgeon allows, then gradual strengthening of the rotator cuff and shoulder-blade muscles, and finally sport-specific work. The aim is to protect the repair early, then regain motion and strength without putting the shoulder in the dislocation position. Your surgeon and physiotherapist set the programme; timings here are approximate.
Exercise phases
| Phase | Approximate timing | Example exercises |
|---|---|---|
| 1. Protection | Weeks 0–6 | Hand squeezes, elbow and wrist movement, shoulder-blade squeezes, pendulum if your surgeon allows |
| 2. Motion | Weeks 6–12 | Assisted arm raises with the other hand or a stick, limited external rotation, light isometrics |
| 3. Strengthening | Months 3–4 | Band internal and external rotation, shoulder-blade exercises, balance drills |
| 4. Sport | Months 4–6 and beyond | Graded throwing, power work, sport-specific drills |
Phase 1 exercises (weeks 0–6)
- Hand squeezes: squeeze a soft ball 10 times, several times a day.
- Elbow and wrist movement: with the arm in the sling or by your side.
- Shoulder-blade squeeze: gently draw both shoulder blades back for 5 seconds and repeat.
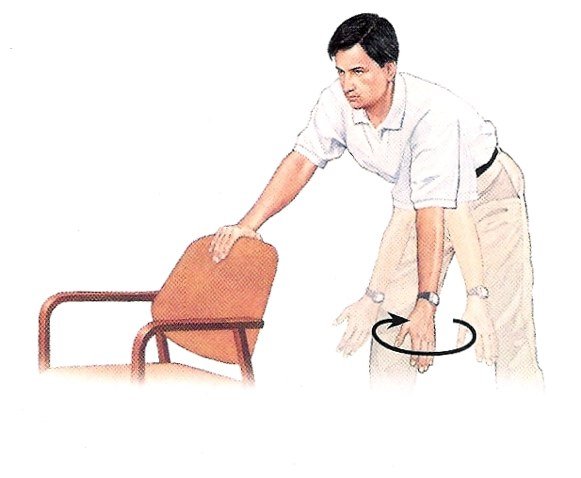
- Pendulum: lean forward supported on a chair or table and let the arm hang and swing in small circles driven by your body, not your shoulder muscles.
Phase 2 exercises (weeks 6–12)
- Assisted raise: lying on your back, lift the operated arm forward with help from the other hand or a stick.
- Limited external rotation: with a stick and the elbow against your side, only within the angle your surgeon allows.
- Isometrics: press the hand against a wall forwards, backwards, inwards and outwards without moving, 5 seconds each.
Isometric exercises in detail
Isometric exercises strengthen muscles without moving the joint, so they suit the start of the strengthening phase. Stand beside a wall with the elbow bent 90 degrees and against your side, then press your fist into the wall or a cushion: forwards, backwards with the back of the hand, inwards, then outwards. Press at about half effort for 5 seconds, relax, and repeat 10 times in each direction. These prepare you for resistance bands safely.
Phase 3: strengthening with resistance bands
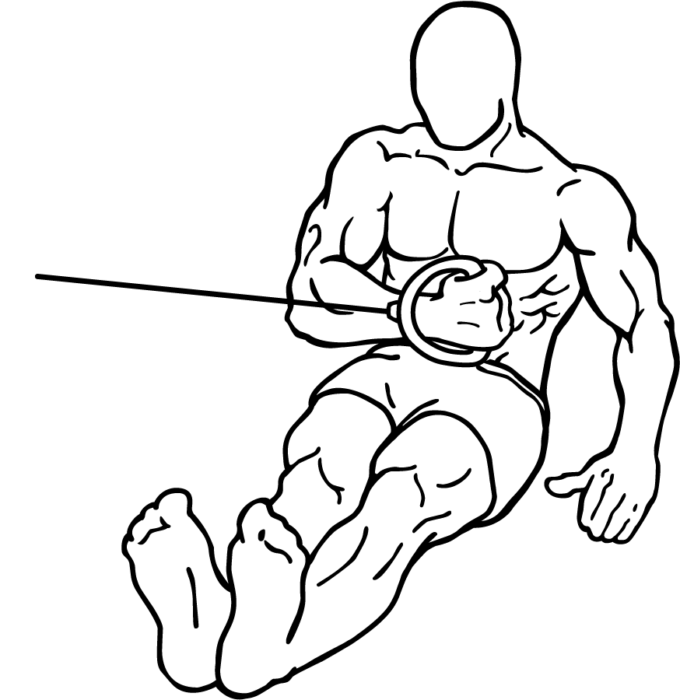
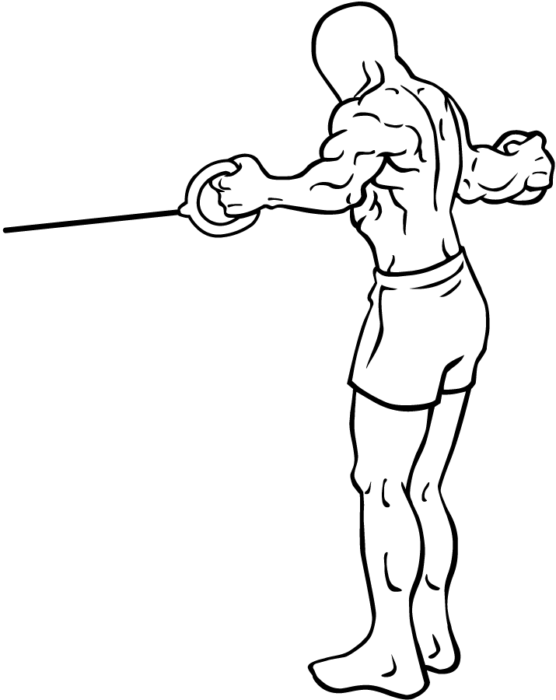
- External rotation: band anchored at elbow height, elbow against the body at 90 degrees; turn the forearm out slowly and return — within the allowed angle.
- Internal rotation: same position, turning the forearm towards the stomach.
- Rows: hold the band in front with both hands and pull back while squeezing the shoulder blades.
- Forward raise: to shoulder height at first, then higher gradually.
Movements to avoid in the first months
- Raising the arm out to the side while turning it back (the throwing position).
- Carrying heavy loads or pushing up with the arm.
- Push-ups, pull-ups and overhead lifting before your surgeon clears you.
- Contact sport before about 6 months and passing the tests.
Rules for exercising safely
- Move slowly and with control; stop at sharp pain (mild stretch is fine).
- Repeat exercises 2–3 times a day early on; in strengthening, fewer repetitions with better quality.
- Ice for 15 minutes after exercise if pain or swelling increases.
- Do not move to the next phase before mastering the current one and getting your physiotherapist’s approval.
- Keep up cuff and shoulder-blade work even after returning to sport, as prevention.
Return-to-sport phase
From months 4 to 6, sport-specific work begins: graded throwing for handball and basketball, catching and falling drills for goalkeepers, progressive bag work for boxers, and advanced push-up progressions. Motion and strength are measured against the other shoulder, and full return to competition follows passing these tests and your surgeon’s approval.
| Test | Target before returning to sport |
|---|---|
| Range of motion | Close to the other shoulder, pain-free |
| Internal and external rotation strength | Close to the other shoulder |
| Stability | No slipping sensation in sport positions |
| Confidence | Ready to play without fear of dislocation |
Exercises without surgery
For people treated without surgery after a first dislocation or mild instability, the programme follows the same principles at a faster pace, since there is no repair to protect: a short rest in a sling, then motion, then cuff and shoulder-blade strengthening and position-control work. If instability continues or the shoulder dislocates again despite the programme, the next step is assessment — see recurrent shoulder dislocation.
Common mistakes in shoulder rehab
- Stopping exercises as soon as pain improves.
- Lifting weights in the gym before the strengthening phase is complete.
- Rushing exercises without control.
- Neglecting the shoulder-blade muscles and training only the arm.
- Going beyond the allowed external-rotation angle in the early weeks.
How do you know you are ready for the next phase?
- You can do the current exercises without pain that lingers afterwards.
- You have reached the target range for this phase.
- There is no swelling or feeling of instability.
- Your physiotherapist and surgeon agree at follow-up.
Video: a simple home shoulder movement test
Frequently asked questions about exercises after shoulder dislocation surgery
When do exercises start after shoulder dislocation surgery?
In the first days with the hand, wrist and elbow, then shoulder movement as your surgeon instructs.
Which exercises are forbidden after surgery?
Raising the arm out while turning it back, carrying weights, and overhead gym work in the first months.
When does strengthening start?
Usually around 3 months, with light resistance bands and slow progression.
Can I do the exercises at home?
Mostly yes, with physiotherapy follow-up to check progress and adjust the programme.
When can I go back to the gym?
Leg work and running may start early; arm work progresses after about 3 months, and heavy overhead lifting after about 6 months with your surgeon’s approval.
To have your shoulder assessed, book a consultation, call +20 155 240 4488 or message us on WhatsApp at +20 155 554 7181.
Medically reviewed by Prof. Dr. Ibrahim Shaarawi, Professor of Orthopaedic Surgery. This article is general medical education and does not replace an examination or the plan your surgeon sets for you. See our medical disclaimer.
Related shoulder dislocation guides
Exercise is one part of recovery after arthroscopic shoulder stabilisation surgery. Read also:
References
- Kim SH, et al. Accelerated rehabilitation after arthroscopic Bankart repair for selected cases: a prospective randomized clinical study. Arthroscopy. 2003;19(7):722-31.
- American Academy of Orthopaedic Surgeons (OrthoInfo). Shoulder Surgery Exercise Guide.
- American Academy of Orthopaedic Surgeons (OrthoInfo). Chronic Shoulder Instability.